 |
 |
|
I have been asked to publish this article that appeared in The New Bookbinder volume 21 in 2001 and is now difficult to find.
THE UNTOUCHABLES
(some ideas to preserve prints and graphic works)
Some years ago I was asked to design a series of covers for a booklet that could not be sewn because it contained prints that had to be kept untouched. These are the solutions I devised and I have used since for different “untouchable” documents.
|
 |
There is a way of keeping a folded document in place in a folded sheet of strong paper, which can be quite practical. The cover paper should be cut 6mm bigger than the document itself, in order to protect it and to allow the fixing of the thread.
A folded strip of thin parchment is then placed in the centre of the document, and held in place with a thread sewn through the cover and through the parchment fold, running from head to tail. The thread goes through the parchment and the cover folds without touching the document. Outside the cover it goes into a parchment disc, pierced with a punch, then it goes back to the same hole and is fixed with a knot, hidden between the cover and the strip of parchment (click n.1 in the image above).
If the cover is made with handmade paper, the irregular surface helps to keep the document in place.
|
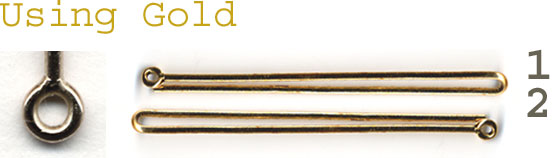 |
I first chose a silky parchment for the cover cut 3mm longer than the document at head and tail with just a small decoration in the wide turn-ins. While the cover was resting under weight (parchment needs time to adapt to a new contour) I began to think of how to link cover and text. I asked a jeweller friend of mine to make a fine tube which could be placed in the middle of the section and two 'hairpins' (see image above) which were to be placed at the head and tail to clip the two parts together (click n.1 in the image above). One end of these pins slots into the wire while the outer part ends with a small, flat ring (see image above) which can be fixed outside the cover by a thin thread which runs between the cover and the booklet. To prevent the two pins from moving sideways a small hole is pierced in the parchment at head and tail. The pins go through this hole before entering the central wire.
Using the same 'hairpins' but this time without the central wire has proved sufficient for a very simple handmade paper cover (click n.2 in the image above). The folded paper is cut 3mm longer at head and tail than the document and has very wide foreedge turn-ins which provide further protection and strength. In this instance the pins were made of grey gold which looks like silver but does not tarnish. The inner wire is not necessary because handmade paper holds the booklet in place better than parchment. The cover is pierced at its central fold at head and tail for the pins to go through and then, as before, the outer rings are fixed outside the cover by a thin thread which runs between the cover and the booklet.
Any of the above solutions could prove useful for the covering of ancient booklets whose external sewing and fragile paper covers need to be protected when being manipulated by readers (you can find this kind of protection in my Tomorrow's Past binding of 2004 on Piaceri degli amanti and see a detail of the pins at the binders section).
The Iowa University handmade paper [3], has texture and length which allows very flexible solutions, and has been used to make the last two bindings.
|
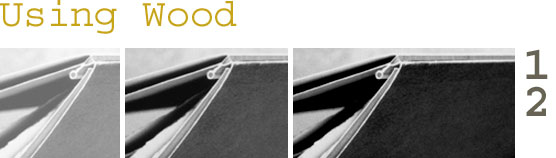 |
A sheet of paper 30mm longer than the document and, if possible, four and a half times its width should be cut and folded down in the middle of its length. The two sides of the cover are then folded backwards at a distance of 14mm from the central fold, the two additional folds making an up side down ‘W’ shaped section. A thin (2mm) wooden stick is cut to match the length of the sheet of paper.
This stick is placed in the fold, aligned with the head and tail of the cover. The paper is put between pressing boards (the stick projecting outside the edges of the boards) and nipped in the press for just one second, in order to allow the paper to fit snugly around the stick. PVA is applied to the shaped fold plus 4mm on each side. The stick is fixed in the middle and the cover left to dry under a weight with the spine area pinched outside the pressing boards, as before.
Once the adhesive is dry, a slit is cut parallel to the wooden stick, the length of the book and the width of the open section. When the cover is finished the booklet will slide into this slit, with the result that the wooden stick will sit in the inner fold of the booklet (click n.1 in the image above).
At this stage a second wooden stick which is triangular in section is prepared. The shorter side of this triangle has to match the depth of the document plus that of the inner flaps of the cover. This stick will be placed in the middle of the ‘W’. The short side of the triangle is aligned with the two folds to form the spine (click n.2 in the image above). If desired this second stick can be titled. The triangle is then fixed with PVA between the folds.
At this stage the two covers are wide open and the central part, where the wooden back is, is placed between two sheets of émalène [4] and allowed to dry under a slight pressure. The book is then introduced into the slit. The two covers are folded inwards leaving a 2mm square at the fore-edges.
|
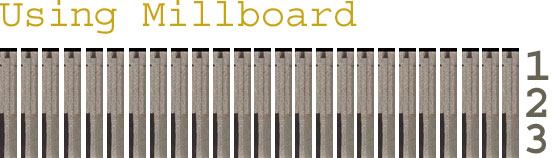 |
A strip of acid free millboard and a sheet of handmade paper are the only materials needed for the cover of the next 'untouchable' book. Three pieces of 2mm thick millboard are cut (handmade millboard can look very handsome), the first being 18mm wide, the other two 12 mm each. The length of all three must be that of the book plus 12mm. A slit exactly the length of the book is cut at a distance of 6mm from the right side of the first (18mm) piece of millboard. The width should match that of the open section plus the paper used for the cover. Once this slit is cut, the other two millboard strips are fixed to each side of the first one; the idea being that they should reinforce the central part by providing a sound base to counteract its flexibility (click n.1 in the image above). Once the binding is finished, these two pieces will also compensate for the difference of thickness between the book and the spine.
A sheet of paper 2mm longer than the document and, if possible, four and a half times its width should be cut and folded down in the middle of its length. Two more folds are made, parallel to and 5 mm away from the first one on either side, creating a W shaped section (click n.2 in the image above). The two sides of the W are fixed together with PVA, put into a press and allowed to dry, while the inside of the first fold (that is the central part of the W) is left free of adhesive. When the cover is dry it is introduced through the slit in the millboard. The two sides of the W embrace the inner side of the frame. At this stage the two unfolded sides of the cover, which are held backwards, must get into their final position by two more folds, each of which ought to be made 6mm apart from the other two. A new W is then formed in the opposite direction to the first one (click n.2 in the image above). The inner part of the new W embraces the laminated board back and is fixed to it (click n.3 in the image above).
When cover and frame are linked together the two sides of the first W hide the slit. Before introducing the booklet through the slit these two wings must be wide open to allow the section to pass into it without being damaged. Once the back of the section is well positioned in the middle and the inner part of the millboard frame runs in its centre, the two wings return to their previous position and prevent the section from moving (click n.3). This kind of protection is particularly useful for documents made of slippery paper.
I believe these economical means of keeping a document in place while protecting it could be of some help to preserve ‘untouchable’ documents, but I am sure that other solutions can be found, or have already been found, by other binders, and I would be very pleased to know more about the subject.
Acknowledgements
My warmest thanks to Jen Lindsay who endures the task of improving my inadequate English, and never hangs up on me if I call her on Sundays asking for help.
|
NOTES
1 The whole collection of 'Containers for Intragrammes' has been purchased by the Musée Royal de Mariemont, Belgium.
2 'The untouchables' 'provisional/temporary bindings'.
3 The University of Iowa. Centre for the book Papermaking Facility, M109 Oakdale Hall, University of Iowa, Iowa City, Iowa 52242, USA.
5 Émalène is a foam sheet used in boxes by insect collectors on which to pin specimens. It moulds on pressure, but regains its full thickness the next day. Sün Evrard who also uses it adds ‘I use it to cover boards for “glued-on-boards-bindings”. Instead of rubbing the leather down with a folder through paper, I put it in the press for ten seconds. The relief of the grain remains intact and the turn-in folds are nicely moulded’. It is available from Science, Art et Nature, 87 rue Monge, 75005 Paris. In other countries, this may be called Plastazote
|
Most of the images in this page are dromographies. See section "Call me Dromo"
|
 |
|