PUT A FRAME TO YOUR BINDINGS
ACT I
A school of bookbinding somewhere in Sweden. Outside the window the snow is falling peacefully over the trees. A man turns his back to us; he is working, and by the shape of his back we can feel that he is concentrating on a mysterious object we cannot see. Click here to see the images.
The telephone rings.
(The man picking up the phone.) - Verkstan' Manne.
Carmencho - Hello Manne, it is Carmencho.
Manne - Hello Carmencho, are you in Sweden? You sound very close!
C. - I wish I were. No, I am calling you from Italy. Listen Manne I need your help to solve a little problem. You know the Crossed Structure Binding...
M. - (interrupting her) Everybody knows your Crossed Structure Binding!
C. - Don't be silly. Well then, as you know the sewing support for this kind of binding is an integral part of the cover, but with the traditional sewing frame I can't keep the thing in place. I've done another binding - one that I call "label binding" - which has the same kind of problem. Somebody told me that you have devised a way to make a very simple sewing frame, one that you use in your workshops all over, and I would like to know how it works. Could you please send me a fax with the explanations and also take one or two photos so that I can see it?
M. - There's no problem in sending you a fax, but I don't know your "label binding" so you'd better explain it to me first.
C. - All right, I'll send you a fax then. A big kiss to you!
M. - A big kiss to you too!
FAX n.1 - from Carmencho to Manne
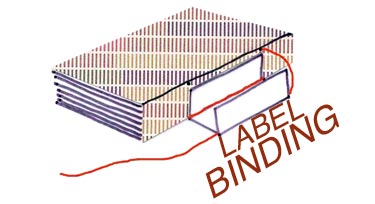
THE LABEL BINDING
When books were not numerous a title was unnecessary, but as soon as they started to accumulate, however, the need arose to distinguish between them, either by labelling or titling. With the passage of time the position of the title changed according to custom and circumstances; thus, titles were soon to be found on the edges, on the spine, or on the boards. Books which appeared after the industrial revolution carried their titles both on the spine and on the cover, as if afraid to remain anonymous, lost among all their peers.
In contemporary design bindings titles are allowed to wander or even to disappear entirely, according to the taste of the bookbinder, since they are unique specimens and immediately recognisable.
I am very fond of all sorts of paper bindings where adhesive is not essential, the advantage being the fact that when they wear out they are easily replaced.
It was while thinking about ordinary books which had suffered damage and needed a simple binding to regain their dignity, that I had the idea of making a covering where the title in itself would not be just a label, but also a means of protecting the sewing support. This binding, which suits average size books, does not need adhesive. The sections are sewn on a thick thread used as sewing support. This same thread holds in place a sound paper cover. Many people may be surprised by the strength of some pure linen papers.
The cover
For the cover, a sheet of paper 1cm. longer than the textblock, and four and a half times its width will be required. Before sewing, the sheet of paper can be cut to size allowing just 1/2mm at head and tail. Folded at the foreedges later on, the covers will be of double thickness.
Preparation for sewing
The sections are pierced as if for sewing on two cords (two sewing stations plus two kettle stitches). Four sewing stations are used when two labels are required. A thick thread is used as support, its length being twice the length of the text block plus 20 cm. The fold of the front joint is made at about the middle of the sheet of paper to be used for the cover. Two holes should be pierced through this fold to match the sewing stations and the two ends of the thread should pass through them from the outside to the inside of the cover, the middle of the thread being placed at the height of the upper hole. A piece of vellum could be placed inside the cover to prevent the paper from tearing at the holes.
The sewing frame
(The following paragraph was completed after receiving fax n. 2 from Manne Dahlstedt)
The back half of the paper hangs in front of the binder, the front fold aligned at the edge of the table. The cover is held by means of a thin ruler clamped in place adjacent to the fold. That part of the cover which overlaps can be carefully folded below the table and is kept in place thanks to the stick under the sewing frame. The two sides of the thread are then fixed to the frame (see image 2). Sewing around the supports is carried out in the usual way. The sewing begins at the front of the volume, the head being on the right side. When the book is out of the frame the thread running outside the front fold is tightened firmly.
The label
Once the sewing is finished, the depth of the spine is known and the back joint fold can be made. Two holes are then pierced on that fold, opposite the sewing stations. The head thread is brought to the outside, while the tail thread remains inside.
A piece of parchment is then cut out to form the label, slightly shorter in length than the distance between the sewing stations, and three times the width of the spine. This is folded into three: the central part, equalling the width of the spine, can be lettered directly or separately labelled in paper. If the label is made in transparent vellum, the piece of paper which carries the title can be fixed inside and remain protected. The side sections are folded inwards, upon themselves. The side sections of the label are then slightly sanded to create a key for the adhesive which will fix them together (one side being sanded inside and the other outside).
The book is placed with its front cover down on the table, so that it is possible to slide the label underneath the thread stretched on the front joint. The front fold of the label is thus aligned along the length of the front joint (see image 3). The free thread is placed inside the label, along its back fold, the end being left loose outside (when the label is finished this second thread will run parallel to the one on the front fold). The two sides of the label are fixed one over the other with PVA (see image 4). The adhesive should not come into contact with the free thread. If desired, a strip of heavy paper may be placed inside the label to keep the back thread in place (this strip will be taken away when the label is dry). The label is then allowed to dray under weight.
Finishing
Once the label is dry, the free end of the thread is passed inside the cover, through the tail hole. This thread, pulled tightly and attached by means of a double knot to the other end inside the cover, keeps the label and the cover in place (see images 5,6 and 7). The two ends are then cut 1 cm. apart and after being slightly unravelled they are secured under the paper covering the spine. Finally, both covers are folded inwards at the fore edges and cut to size.
The label binding is suitable for books of ordinary size. As regards cover material, I think a decorated paper would enhance the finished appearance. Parchment adds a silky touch and extra strength to this kind of binding, and I am sure many other materials could be used.
Love from Carmencho
FAX n.2 - from Manne to Carmencho
A PORTABLE SEWING FRAME
This is a light weight cheap sewing frame very useful for travelling.
A metal band bent four times at right angles (out, in, in, out) is fixed to a table with two "C" clamps.
A metal or wooden rod is placed through the clamps under the sewing frame. For conventional sewing the sewing supports are fixed at the top of the sewing frame with pegs or clips. At the bottom use small weights like table cloth weights.
Carmencho, for your Crossed Structure Binding you should put a metal ruler between the table and the frame. The ruler will fix your book cover (in this case you would not need the bar).
For your label binding you should use the bar to keep the back cover out of the way under the table.
If for a demonstration you need several frames you can bend them so that they 'nest' together. It will save room in your luggage.
Love from Manne
(See also A Sewing Frame in the Crossed Structure Binding section).
ACT II
A school of bookbinding somewhere in Sweden. Outside the window the snow is falling peacefully over the trees. A man turns his back to us; he is working, and by the shape of his back we can feel that he is concentrating on a mysterious object we cannot see. The telephone rings.
(The man picking up the phone.) - Verkstan' Manne.
C. - Hello Manne, it is Carmencho. The sewing frame you sent me is just perfect, much better than the photos I asked you for! Thank you very much; my friend Loretta is making a box for it. You know I hate making boxes... Listen Manne, do you think that somebody could be interested in publishing both the description of your frame and that of my label binding? Don't you think they could be useful to other people?
M. - I have no idea.
C. - What about sending our faxes to Jean Stevenson to see if she would be interested in it for the Guild of Book Workers Journal? I'll do that and let you know. Ciao Manne, a big kiss to you.
M. - A big kiss to you too.
This text was published in"The Guild of Bookworkers Journal" - USA 2000