
CROSSED STRUCTURE BINDING LINKED
Click here to see CSB images.
The crossing of the two sides of the cover is done before sewing: this feature makes the CSB Linked particularly strong. Once the sewing is done it is impossible to pull the covers apart.
CSB Linked
I will assume that the book is ready to be bound and that all prior steps have been carefully carried out. The description refers to a full-leather binding with clean-cut edges. I will not work to any particular dimension, assuming the template to be clear enough for each person to adapt it to a given size.
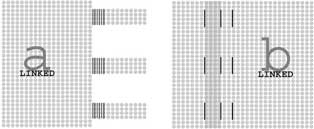
Cutting the back cover
To see the cutting of the straps, go back to Cutting the straps in the index. The two sides of the cover are cut separately.
Cut the back cover following side a of the template with three or more sewing straps according to the size of the book. The sewing straps should be long enough to be secured to the front cover after sewing.
Cutting the front cover
Cut the front cover following side b of the template. The two sides of the covers will be linked together before sewing so we have to guess the approximate thickness of the spine. The front cover includes the cover itself, the spine and the panel that will remain hidden under the back cover.
Make one vertical cut for each sewing strap to go in. This first row of slots is cut at the joint of the back cover, next to the panel. It is important for you to note that the other two rows of slots should be cut after the sewing has been done, when the thickness of the spine is known.
It is extremely easy to invert the parts and get the slots in the wrong place. Making a dummy could help to understand their exact position.
The linkage of the two parts
The straps on side a go into the cuts on side b. In this way the two parts of the binding are linked before sewing.
Preparation for sewing
During the sewing, the book block will be lying on top of the flap over the back cover, while the front cover hangs loose before you. To see the fixing of the cover to the sewing frame go to A sewing frame in the index.
The sewing
The sewing has kettle stitches before and after the first and last straps, to see sewing 4, go back to CSB sewings in the index. Once the sewing is done the two parts of the cover stay linked to one another.
The thickness of the thread should provide enough 'swell' in the spine to allow you to round the book. I always round by hand, not with a hammer. After sewing, the spine is still accessible and can be lined if desired.
Cutting the front slots
The front cover wraps over the spine as it comes forward to lie in position on the book block.
Cut a row of vertical slots at the front cover joint and a second row of slots, parallel to the first, 10mm from the first row. Whilst, for reasons of illustration my diagram may show these two rows of slots already drawn on side b of the template, do not be misled, they must be cut after sewing.
The sewn bands are secured to the front part of the cover being laced out and in through the two rows of slots.
If you want to download the text, templates and sewing of this binding, go to Download CSB in the index.